How to make DIY Alpaca Felted Soap
Felted soap is a fun DIY project for anyone, both children and adults alike. The process is relatively simple and requires only a few materials to get a such a beautiful result. Alpaca fleece or wool is wrapped around a bar of soap, together with warm water and friction an unpredictable piece of matted artwork is formed. This process of felting soap has been around for sometime and was used in place of loofahs, washers, sponges and shower puffs.
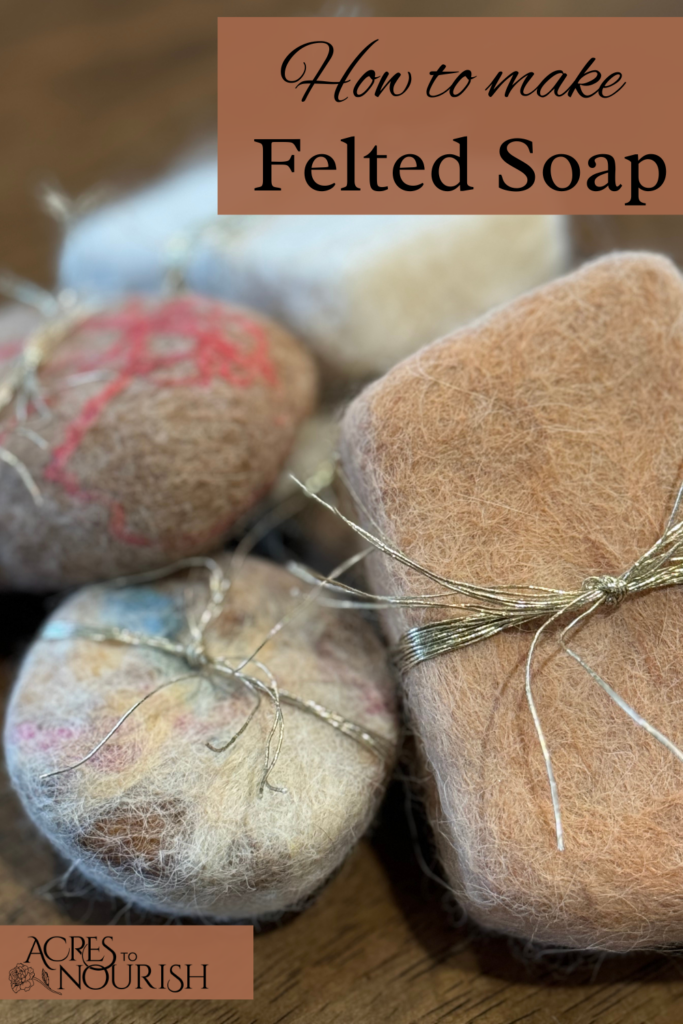
Felted soap is a great DIY project for anyone. It also makes great gifts, especially for those people who already have everything (it is unlikely they will already have felted soap). Unsure of what to do with your alpaca fleece after shearing time? Be resourceful and make felted soap!
The Benefits of Felted Soap
The addition of felt to the soap:
- acts as a gentle exfoliant,
- holds the soap suds,
- makes the soap last longer,
- makes it easier to hold,
- is hygienic (good fleece/wool can have antimicrobial/antibacterial properties),
- and it is pretty.
An Imperfect Craft
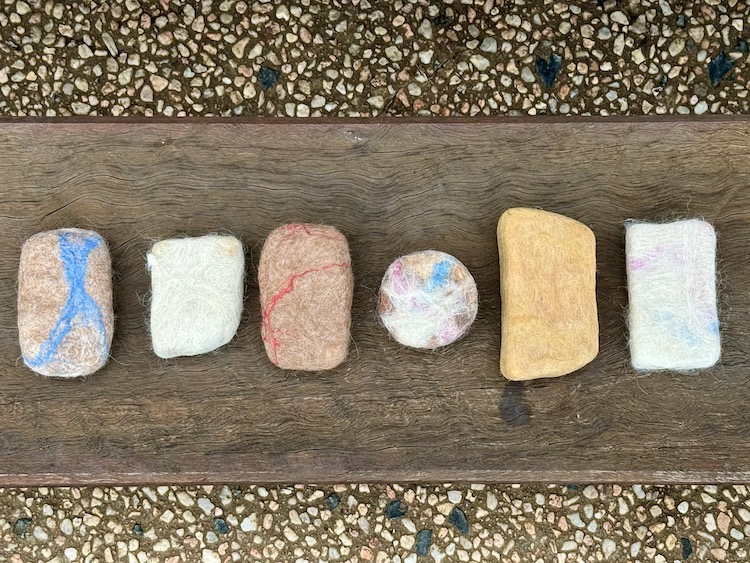
Felted soap can be made in a few ways, however to keep it simple we will concentrate on a basic wet felting type method. Keep in mind that the bars of soap will all be different and imperfect. The joy in making DIY felted soap comes from the fact that every bar will be unique. Although they may not turn out perfect, with bumps and loose strands of fleece or empty pockets, they will still offer beauty in their own organic and rustic way. You cannot ruin it! That is something I love about this type of DIY project. Lets jump in!
Materials needed for Felting Soap
Soap – What is the best soap to use for felting soap? Any type of soap will work. I like to use my home-made soaps for a more luxurious soap feel (and it makes a more special gift). But for wet felting, a hard soap, like olive oil or castile soap, will make the process easier.
Alpaca Roving – merino wool roving will also work. I have also been known to use raw alpaca fleece and just tease it out somewhat to help the fibres felt better. However the roving is usually cleaner and quicker to use. If you are feeling creative you can try a mix of natural and/or dyed rovings.
Ziplock Bag or a bowl – the ziplock bag reduces the amount of water/sud mess, which is great if doing this project with children. The ziplock bag will need to be large enough to fit a piece of soap wrapped in roving.
Hot/Warm Water – whatever temperature you can tolerate on your hands.

The Felted Soap Process
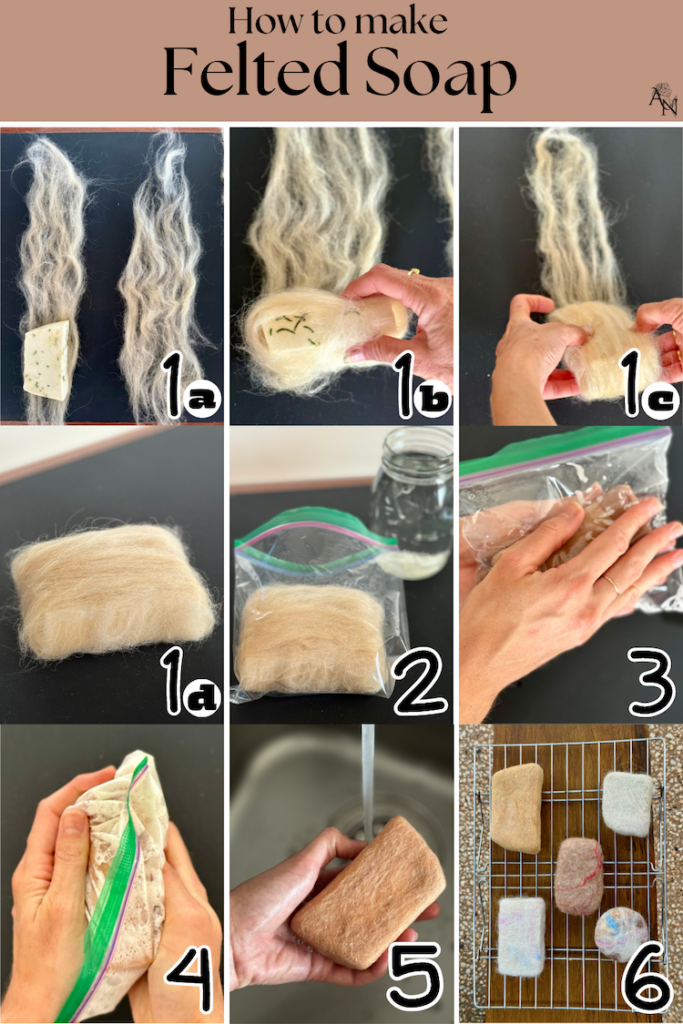
- Wrap a length of roving around the long side of the bar of soap, followed by a length around the short side (the fibres should run perpendicular to each other). You may need to do a few layers and make sure that the roving is wrapped evenly, leaving no thin spots or exposed portions of soap. Be sure not to cut the roving and instead just pull it apart. Be creative and add different colours!
- Place the wrapped soap in a ziplock bag and pour in some hot water. If you find the soap isn’t lathering, add some more hot water.
- Move the soap gently between your your hands until the fibre starts to shrink and mesh together. Be very gentle during this process to prevent the fibres slipping off the soap.
- Once the fibres have started to shrink and mesh together you can begin to agitate the soap some more, ensuring you are working all surfaces. Add more hot water if required. This process will take some time, approximately 15+ minutes.
- When the fibre is tight and seems to be sticking to the soap remove it from the ziplock bag and check the progress. The process will be complete when the fibres are tight around the soap and are all stuck together. If there are loose strands or you can pull pieces off, continue the agitation process.
- Once the felting process is complete, rinse the soap with cold water and place on a cooling rack and allow the soap to fully dry. Placing the soap in the sun will speed up the process.
I hope you enjoy your felted alpaca soap!
Just some quick notes….
- Let the soap dry after each use, this will help it last longer.
- As the soap shrinks with use, so will the felt.
- Once all the soap is used up, cut the felt and add another bar of soap; or use it as a wash cloth or cleaning scourer/sponge; or compost it.
- The more fibre used during the felting process, the thicker the felt and longer the soap will last.
- Less fibre means a thinner felt and increase in lather.
- Be very gentle during the beginning of the agitation process. You want the fibre to shrink and felt at the same time, otherwise lumps will form.
- Tie a string or ribbon to the soap/felt and hang it from the tap for added creative flair.
- Remember felting soap is an imperfect craft. Don’t stress if there are lumps, or loose strings. Enjoy the beauty of the imperfections!
We would love to see your creations! Share them with us!
Pretty greqt post. Isimply stumbled upon your weblog and
wanted to say that I have truly enjoyed surfing around your blog posts.
In any case I’ll be subscribing on your feed and I hope you write again very soon!
Have a look at my homepage: https://greenandultimate.com.au/how-to-avoid-a-drain-plumbing-emergency/
Thank you so much for your encouragement! I have recently written another post. I am hoping to have more time soon to be able to post more often. I really enjoy writing about what I love.